Showing posts with label Wildlife. Show all posts

Tuesday, July 2, 2013

Den of Reds

Prior to getting started with this post, I feel it may be necessary to define a term:

Shatscatter (noun):  1) An irregular and/or unexpected dispersion of shat. 2) Any voluminous mass consisting in whole or in part of decaying vegetable matter, macerated life forms, mammalian offal, or excrement which can be splashed, sprayed, fallen upon, or diffused in alarming fashion.

If you have never knelt down in a sulpherous shatscatter while wearing a really nice pair of jeans - you may not have engaged in extensive wildlife photography.

This Spring I was fortunate to happen upon a den of red foxes, which is a first in my lifetime of outdoor pursuits.  Numerous trips were made to the location as the kits were actually using two dens, separated by several hundred yards.  One spot was well-suited to morning light from the East, while the other was only approachable from the West and best photographed late in the evening.

Den #2 was an elevated mound in the middle of considerable, swamp-like shatscatter ranging in depth from 4 to 12 inches.  Having scouted the location I brought shat-proof boots that I knew would allow me to approach the den to within 20 yards or so.  The kits had been spending most of their time on top of the den, so I planned on being able to shoot from a standing position, putting me at eye-level with the young foxes.

I setup while the kits were inside the den so as not to alarm them one evening.  To my surprise, as all seven of them emerged to play in the cooler temperatures of dusk, the group became extremely curious.  Three of the foxes left the elevated area behind and moved towards me onto a much smaller mound only 4 yards from my lens and much lower than my line of sight.  Animal portraits are far more engaging when captured from an eye-level perspective, so I knew the only option was to kneel down and sit on my heels.

In one fluid movement, I descended into a shatscatter that would give a muskrat a fit of the dry heaves. This was the type of fetid ooze that a pair of pants never fully recovers from, and that potentially can fracture a marriage upon returning home.  The result was that I avoided casting a shadow into the frame and was able to get the imagery I was chasing.

Sitting Fox Blog Size

Red Fox Kit - Vigilant

Red Fox Kit Watching the Sunset

Blog Size - Red Fox Kit Closeup

Blog Size - Grassy Stare

A number of the images are landscape orientation and best viewed larger than my blog format accommodates.  If you are interested click on over to my Flickr set where these shots and others can be seen in higher resolution:

Red Fox Set on Flickr

Happy 4th of July everyone - get out there and step in something.

Monday, February 18, 2013

Whiteheaded Largebird

Have you ever been so cold that your reproductive regions could be preserved for cryogenic science with no additional cooling required?  One of the great things about wildlife photography is the way in which you can experience abject misery for extended periods of time.

Take this weekend, for example: I stood within 40 yards of a whole convocation of bald eagles for an interval so extensive that whole life cycles of insects were taking place around me. Eggs were laid. Larvae hatched. Eventually these were able to successfully pupate and emerge as sexually mature adults. Temperatures were well below freezing. During this veritable epoch, a vast expanse of fog settled upon the wetlands obliterating all hope of anything resembling a successful photograph.

The day ended.  Total clicks of the shutter: Zero.  This is the part of wildlife photography that isn't always apparent - the time that is allocated to pitiable failure and adult language.

Dawn the following day brought identical conditions.  After a few hours, however, a rapid change took place  and suddenly the air was clear.  Light rained down.  Eagles flew.  Birder's Remorse faded.  Shutters clicked.

Gear Down

Image Details
Nikon D4
Nikon TC17EII
Nikon 400mm f/2.8 VR @ f/4.8, 1/1600, ISO 100

Sunday, February 5, 2012

R.O.U.S.

If you are a dog owner you know that one of the 3 perils of the uplands is the North American Porcupine, or Rodent Of Unusual Spikiness.

R.O.U.S.

Having a pup get a face full of quill pig is no fun, as I can personally attest.  Yesterday I was out in the field without dogs, looking for raptors with JayMorr.  When you don't have to worry about your pointers, these can be fascinating creatures to watch.

Sticky Situation

Ambling about in the unconcerned manner of an animal coated in acupuncture needles, Porky is easy to approach.  While the concept that quills can be launched is a myth, porcupines still have a chip on their shoulders because they place 3rd on the list of large rodents behind the capybara and beaver.  No one likes to be number three.  Use a little caution - as they will swat you with their tails if given the opportunity.

As wildlife goes, the quill pig is a relatively easy subject to photograph once located.  The main consideration is not to be lazy and fire away from a standing position (which creates an awkward, downward-looking perspective).  Go ahead and get dirty.  Sitting, laying on your side propped up with an elbow, or going prone are all options that will put you at eye level with the subject for a more engaging image.

Porcupine Portrait

It's hard to believe it's February out there with highs in the 45° F range, no snow at mid-elevations, and copious sunshine while it should be the dead of Winter.  I for one am not complaining.


Monday, January 16, 2012

Getting Started in Photography - Part 3

This week the eyes of world have been on CES, or the Consumer Electronics Show.  A huge part of the proceedings involves photography equipment which will allow you to get unprecedented shots of awesomeness.  Sadly, without the latest gadgets, your imagery is doomed to becoming a festering pile of digital offal.

In this installment of GSiP, Fly to Water saves you the cost of a brand spanking new Nikon D4 and spills the beans on how to get excellent, close-up shots of wildlife by:

Getting Close Enough to the Wildlife

Snowblind

(Photo of me: www.jaymorr.com, Post: Me)

One of the biggest misconceptions out there is that prime lenses, like spotting scopes, are designed for high magnification.  It's wishful thinking.  Baboons probably wish they didn't have those garish, red asses all the time but it doesn't change anything.  Expensive glass is actually designed around a very large aperture, which allows more light into the camera and therefore expands the range of conditions that can be dealt with by the photographer.

In these posts I've tried to offer some low-cost suggestions that helped me greatly in learning how to advance my outdoor photography.  The single, most significant improvement you will ever see in your wildlife images will come from learning how to get closer.  Gear is nice, and over time you will find yourself upgrading.  Here's the bottom line: My best wildlife images have come from my closest encounters with wildlife.  A few weeks ago I captured my all-time favorite image a of a chukar partridge.  I was 6 steps from the bird, in good light.  The result would have been great with any SLR and 300mm lens, or point and shoot with 6x optical zoom.

The motif you might be noticing is: WORK.  There is no EASY button or quick fix.  It will take a lot of time and patience - patterning and stalking animals involves skills which must be developed and practiced.  Effort and dedication provide the pay off - everything else is secondary.  The best advice I can give:

Find a place where your subject wants to be, and habitually frequents.  Get there first, and wait.  It's that simple, and that complex.  Many are unprepared for the time investment.  As a somewhat general rule, the average is probably close to 1 good opportunity per full day in the field with wild subjects.  Understand that, and have realistic expectations.  Your commitment will pay dividends.

Bird's Eye View:

Shooting the Gap

( Photo of me: www.jaymorr.com, Post: Me)

My View:

California Valley Quail - Side Light

California Valley Quail
Nikon D300, f/8, 1/125
Nikon 400mm f/2.8 VR
Nikon TC20-EIII Teleconverter
Distance to Subject: 8 paces

Friday, January 13, 2012

Getting Started in Photography - Part One

Here we are at the beginning of 2012, less than 12 months away from the END OF THE WORLD on December 21st according to the Mesoamerican Long Count Calendar.  As a major socioeconomic force, Fly to Water will now respond to these most weighty of matters by discussing: How I got started in photography.

In the Fall of 2005 I was contemplating a great truth: There were people who could take a quality photograph, and I was NOT one of them.  At the time my definition of "quality" was somewhat limited, but I knew that certain images were engaging, held my attention, and struck me as art.  By contrast my work was as attractive as an uncorked bung hole.

Of course I had the option of going out and buying a nicer camera than the Nikon D70 I was shooting, which would make an immediate difference by doubling the file size of my schlocky snapshots.  Oddly, many people believe in the mathematical formula E = GP², where E is an expensive camera and GP is a constant called "good photos."  I call this the Kopi Luwak delusion: You'd think I was making this up, but there are actual people who profess that because coffee beans are eaten by a civet cat and shat out in the jungle, they make a phenomenal beverage.  Now the civet cat is a fine animal, and my Nikon D70 was a solid camera, but it turns out both can be sorely misused.

This leads me to my point: Dudes are out there selling palm civet dingle berries for $160/lb. 
If you're getting started in photography or looking to improve prior to December's sweet release, consider this:
  • Anyone can take great photos, regardless of what you feel your natural talent/ability level might be.
  • You will need to work at it, with the same kind of dedication that it takes to sell cat crap coffee.
Very early on I came to the realization that successful images happened because of the human elements of photography.  More importantly, I began to discover that many of the qualities generally described as "artistic" were acquirable.  There were principals, camera controls, and techniques which could allow me to get the results I wanted - if I was willing to educate myself.

Step One: Composition

We live in a 3-dimensional world, and from the youngest of ages our minds are conditioned to connect with an environment that involves depth, distance, and perspective.

I was fascinated to learn that the human mind naturally imposes 3-dimensional thinking on flat, 2-dimensional images.  It turns out that fairly straight-forward guidelines exist which help broker the connection with the viewer.

In a general sense, this is called "composition," or the way in which objects are arranged (intentionally and creatively) within the frame. There is nothing about composition that should be left to chance. Inclusion, exclusion, angle of view, position relative to the subject(s), portrait vs. landscape orientation, foreground, background, and many other considerations play an enormous part in how the viewer will interpret a 2-dimensional image.

It took some reprogramming for me to begin seeing in 2 dimensions - actively thinking about how I would use the spacial relationships in the frame to hold attention rather than create distraction.

The topic is too broad to cover in a blog post, but here is the take away: Regardless of your equipment, there is a FREE way of making your photos more engaging with simple compositional techniques that can be learned and practiced at home.  I started by reading Photographic Composition, and Brenda Tharp's excellent Creative Nature and Outdoor Photography - both available on Amazon for about $15 bucks.

Read up before 12/21/12, when it will be human sacrifice, dogs and cats living together... MASS HYSTERIA.  If this has been helpful, drop me a line.  I've got a few more pre-cataclysm thoughts brewing.

Sunday, January 1, 2012

Chasing Quail

When all else fails...NEW TACTICS.

Around Thanksgiving I wrote HERE about a covey of jittery, rural quail that have unabashedly given me the bird for years.  This group and I have a certain understanding: I foolishly attempt to approach them, and they in turn show me their asses at 100 yards.  It's not an equitable arrangement. 

As the new year approached, I began wondering if a tried and true upland hunting technique - using a blocker - might work on the photo front.  Thinking back, I believe my wildlife photography has benefited greatly from a lifelong background as a sportsman.  Understanding animal behavior patterns, body language, vocalization, and other factors seems to provide me at times with an edge behind the lens.  The idea of pushing/blocking upland game is not new, but shotguns have an effective range of about 50 yards - a distance that needs to be cut in half with a camera.  Still, it was a concept that seemed worth testing out.

I gave Jason Morrison a call, and the game was afoot.  Jay is a guy who I knew had the skill to nail a fleeting opportunity that would last only seconds.

Arriving at the scene, an old farm in Northern Utah, I was disappointed to find that the birds did not pass the night in their usual spot.  It was a downer, because the golden light of morning created a perfect stage upon which there were no performers. Preparing to seek other possibilities, we suddenly noticed the covey near an old corral that had not seen use in ages.  It was at this point that long experience with upland birds kicked into gear, and I knew even before our approach that the situation was ideal.

It was my feeling that the covey, upon seeing my voluminous biomass heading in their direction, would sprint along the corral's contour for some 75 yards.  Here, they would reach a dead end and begin flying up onto some aged fencing and an old, rock wall.  Doing so would give them an escape route to the wheat fields beyond.  If Jason could position himself near this natural collection point in advance, he would have front row seats as 30 quail paraded past him at about 8 paces.

Morrison took the road less traveled, going far out of his way and remaining concealed from view until he eventually circled back about 20 minutes later and got into position.  I knew the birds wouldn't let me get close, so in the meantime I dug out my Nikon TC20-EIII, a 2x teleconverter that would double the focal length of my lens.

Getting the ready signal from Jay, I emerged from cover and vectored towards the corral.  I say "vectored" because it's something of an art to advance on animals without appearing as if you are necessarily headed directly at them.  It's one of those "look casual" things.  As the pusher, I carefully observed the birds in the covey to watch for signs of nervousness, and paced myself to avoid a flush.  The quail moved deliberately, but not in a panic, towards the blocker position.  A few stragglers occasionally tried to double back, and afforded me several medium distance shots from perhaps 20 yards.

Male California Valley Quail - Fence Rail

Female California Valley Quail - Barn Wood

At one point I was able to lie down and capture a unique image as this male passed into a natural frame created by the bottom rail of the corral and 2 posts.  Shadows from the fencing formed a number of leading lines, drawing the eye towards the well-lit subject:

Male California Valley Quail - Framed by Old Fence

The day nearly ended in tragedy as JayMorr encountered a rare, silent killer: A quail stampede. 60 tiny feet, possibly descended from the velociraptor's, bore down on the blocker position.  From my perspective the whole thing wound up looking like some kind of avian flash mob dancing a Spanish Flamenco around Jason.  True to form he did not miss the opportunity.  Be sure to drop in and see some of his fantastic imagery - shot from 8 paces (HERE).  If you haven't attempted to photograph wild, rural game birds - it's difficult to articulate how extraordinary a situation like this really is.  The aggregation of great light, point-blank subjects, correct position relative to the sun, and very little time to work with all combine to make Jay's photographs remarkable.  It was the ideal way to spend New Year's.  A big congrats to Morrison on his first wild California Valley Quail images, and all the dues that were paid leading up to the moment.

Nikon D300
Nikon 400mm f/2.8 VR - f/8, 1/320, ISO 400
Nikon TC20-EIII Teleconverter
Distance to Subjects: 60 Feet/20 Yards

Tuesday, December 27, 2011

Devil Birds

I had been hiking for a while now.  The ambient temperature was 14° F (-10° C), which was comfortable.  A few years ago my outdoor wardrobe experienced some natural base layer enhancement courtesy of merino wool, which is a miracle fiber.  Like your garden variety wool it insulates even when wet, but against the skin it does not itch and feels like fleece.  Inexplicably it can also stave off odors for a remarkable amount of time, and it breathes extraordinarily well.  I was glad to have my Icebreakers on this occasion.  Incidentally, if you are one of my fly fishing readers, merino socks by this company are the dog's bollocks (meaning badass in the UK) for cold weather wading.

Chukar partridge were my goal for the day.  Early in the Fall it's often possible to locate a covey by listening for calls, but typical of this time of year it was dead quiet.  Wild birds soon realize their chatter is giving them away, and they start dishing out the silent treatment.

Hiking in the steep, rocky talus that chukars love with a 14-pound camera rig offers a pucker factor of about 9.0.  Opportunities can be so unexpected and fleeting, I've never been able to successfully make use of a tripod, monopod, harness, or pack.  It's all free-hand.  At double the weight of a typical shotgun, and with the awkward size/shape of a big telephoto, the visual is like watching someone Riverdance on a cliff face while cradling a huge baby.

Presently due to insubordination on the part of my pulmonary system I stopped to catch a breather in a large boulder field.  About 3 weeks ago I acquired the felicity of walking pneumonia and am still feeling the effects.  After a minute or two, what I can only describe as a chukar whisper seemed to emanate from the rocks to my immediate left.  The sound was barely audible, and far more subdued than I had ever heard before.  My thought was that the call must have been more distant and I'd experienced a sound effect in the strewn boulders.

Following a few seconds of questioning the wisdom of combining thin air with cough syrup, I heard it again - "chuk-chuk."  There were partridge about, and they were close.  Really close - within feet.  Over the last 25 or so years, I've hiked, hunted, scouted, and photographed in chukar habitat hundreds of times, and I can't say that I've ever managed to get nearer than 15 yards.  Until now.

 Wild Chukar Partridge - Spitting Distance

18 feet in front of me a mature, well-marked bird hopped up on a rock and was positioned ideally to catch the morning sun.  Had I not been forewarned by the muted calls, which enabled me to raise my lens just in time, I have no doubt a flush would have been instantaneous.  As it was, I captured a short series of images from spitting distance.  At this range I believe my Sitka Gear Open Country camouflage probably made a huge difference, allowing me blend in under point blank scrutiny.

See No Evil

This was a great way to finish out 2011 - with a humbling opportunity that I was privileged to see through the viewfinder. 

Wild Chukar Partridge - 6 Yards

Nikon D300
Nikon 400mm f/2.8 VR - f/8, 1/320, ISO 400
Distance to Subject - 6 Yards/18 Feet

Saturday, August 20, 2011

Loaded for...Chipmunk

On a recent hike into the backcountry looking to photograph elk, I decided to carry the Boomstick - a Nikon 400mm f/2.8 AF-S VR lens. When I say "carry" I don't mean in a backpack or harness, I mean freehand.

With camera and grip attached, this rig weighs in around 13 pounds. I often carry this lens without a pack, and shoot it hand held. Mature bull elk in areas where hunting is prevalent are a cagey bunch, and opportunities can last only seconds.

In this case, however, I hiked over an area roughly the size of the Louisiana Purchase and didn't catch a single glimpse of elk hide.

As I was making the steep descent back to the vehicle, I came across a common Least Chipmunk, neotamias minimus.

A few things jumped out at me when I spotted this little guy.
  • He was facing towards the sun, allowing for the all-important catch light to be reflected in his eye. This is a small detail that is always on my mind when photographing animals.
  • The chipmunk was positioned on a log that would give the foreground some texture, as well as a little elevation from the grasses on the forest floor.
  • Most interesting was the pattern of pine needles and leaves in the foliage beyond the perch. I immediately knew this would make for a soft, dappled, pleasing background.
When looking to capture an image of a relatively common subject, consider ways you can make the rest of the frame uncommon. Foreground, background, texture, and details like catch light are great ways create engagement with the viewer.

The final step involved compositional fundamentals.
  • It is key in wildlife portraits to shoot at eye level. I had to get very close to the ground to accomplish this, but it's important because downward angles in photography weaken the subject's presence in the image.
  • The chipmunk's eye is located 1/3 of the frame from the top edge, which is a foundational element of the Rule of Thirds as it applies to portraits.
  • Lastly, I chose a position that allowed the chipmunk's tail to enter at the corner, creating a natural leading line for the eye to easily follow into the photo.
When getting outfoxed by the day's primary objective - improvise and look elsewhere. The practice pays off when the main event suddenly shows up, and all these fundamentals need to be more instinctive and less deliberate.

Snacking Chipmunk

Nikon D300
Nikon 400mm f/2.8 AF-S VR (hand held) - f/5.6, 1/250
LensCoat Camoflauge
Equivalent Optical Magnification: 8x
Sitka Gear Open Country Camo
Distance to Subject: 20 feet

Monday, February 14, 2011

Girls Girls Girls

Girls rock.

Hens Rock!

Females that is - or in this case hen mallards. In the world of waterfowl, it seems as though the males of the species seem to have been universally endowed with all the gaudy colors and ostentatious iridescence that nature can bestow.

I admit to harboring a penchant for the ladies, however. Smaller overall weight and less muscle mass makes for more fluid shapes, graceful lines, and light movements. Hens are where it's at. Who's with me?

Girls Light Out

Mallard Hen Wing Blur

Mallard Hen in Flight - Droplets

Wednesday, February 9, 2011

Soar Spot

In large part I've been spending any and all spare daylight shivering uncontrollably in temperatures ranging from -20° F to a balmy 37°. Each year for a couple of weeks, a wave of migratory bald eagles passes through the wetlands surrounding the Great Salt Lake.

Inexplicably, even though I have repeatedly "learned my lesson," I continue to forsake my furnace and choose instead to lower my core body temperature to the threshold of hypothermia. Why? Several theories have been offered, but Mrs. FlytoWater's commentary on the subject is wildly inaccurate and notoriously lacking in substance. Like migratory instincts themselves, little is known about the motivations of fly fishermen or bird photographers. Collectively, we remain somewhat of a mystery.

Prior to the intake of copious hot liquids, I will share a few images from the last couple of days. Eagles are fascinating raptors, commonly living into their late 20s (and occasionally as long as 30 years). Young eagles do not achieve their mature plumage until sometime in their 5th year. Juvenile baldies are commonly mistaken for golden eagles due to their mottled, brown plumage. The rare and fleeting close encounter with these majestic animals is always worth the many hours of waiting in the cold.

Diagonal

A juvenile bald eagle sporting the distinctive eye band "mask" they have in this age class:

Juvenile Swoop

Masked Juvenile

More mature plumage...

Soar Spot

Last Light Before the Storm

Bald Eagle Underwing

Eagle Mountain

Into The Light

Coming Fast

Looking Down

Banking On It

Sunday, January 23, 2011

Scouting

A few wisps of blue sky showed themselves occasionally this weekend, and I spent some time scouting locations for raptors. Aside from getting to watch a great blue heron spearing voles with amazing accuracy one evening after the light had faded, nothing noteworthy really took place.

Utah's Wasatch Front experiences a widespread temperature inversion during the winter. This phenomenon causes an enormous pollution cloud, even larger than the one emitted by Al Gore's personal residence, to hover over the valley.

Spending any time outdoors under these conditions is akin to huffing oxides of nitrogen directly from the exhaust pipe of a 1970 AMC Gremlin.

Occasionally a storm of sufficient strength blows through and sweeps the toxic atmosphere up into the jet stream, where it is often mistaken for Icelandic volcano ash and grounds all flights in France.

We experienced one such storm system late last week and had glorious, clean air for the weekend. It was nice just to be outside. I didn't get any images that I'd consider "keepers" but a few birds were in the air and I dusted off the shutter to get in the groove.

I'm hoping the next month or so brings some additional opportunities.

Bald Eagle Sight Fishing

Great Blue Heron in Flight

Bald Eagle with Carp Dinner

Immature Bald Eagle

Eagle Blue Sky

Sunday, January 2, 2011

First Click - 2011

By way of follow up to my last blog post, I've received a lot of e-mail asking for specific tips about photographing game birds, such as the chukar partridge.

I wish I could say it was as easy as picking up a 600mm f/4 lens with a nice window mount, whereupon it becomes immediately possible to capture 5-star images from your climate-controlled SUV.

If it's been a while since you've...
  • Gone out in temperatures cold enough to freeze the balls off a brass monkey
  • Done a "1-legger" down a 3-foot-deep rock fissure drifted over by snow, nearly breaking an ankle in the process
  • Torn your trapezius
  • Sat motionless until cramps were galloping up your legs like Charlton Heston's chariot in the movie Ben-Hur
...then I recommend taking up wild game bird photography for a real treat. Each of the items on that list happened to me yesterday. Luckily, I did manage to obtain exactly 1 photograph for my troubles - which is above average for a typical day.

Checking His Six

The basic recipe for success:

Scouting: The process begins with a scouting trip (or trips) into likely habitat. It's important to locate game birds without disturbing them initially, at least if photography is on the agenda. A decent pair of binoculars and a spotting scope are great tools that help cover a lot of country.

Patterning: Once you have located a population of birds, you want to watch them for a while. It's quite common for these animals to have a routine. You may find a watering hole, food source, spot where the sun hits first thing in the morning, or travel route that game birds use regularly. During this period of observation, you want to take note of lighting conditions and possible hiding spots. Typically you will want to be in a position where your subject is being lit from the front or side, which needs to be taken into account.

Concealment: While non-avian predators and most big game animals see primarily in black and white, birds see in color. Camouflage becomes an important accessory, and it's a good idea to have a few options available to match various types of terrain. My favorite for chukar habitat is the Open Country lineup from Sitka Gear. This pattern has been specifically designed and researched based on how animals see, as opposed to most products that are based on human vision.

I also use a LensCoat to hide the hardware. These are made of neoprene and also provide some protection from dings and scratches in addition to breaking up the outline of the equipment. LensCoat products are available for a wide variety of common camera lenses.

Caught on Film

Waiting: Get into position prior to the time you have observed birds using the location in your scouting. In my experience, wind is less of a factor with birds than it is with mammals. Make sure to dress warmly in cold temperatures, because sitting around doesn't create a lot of body heat. Stay alert and be opportunistic - things will usually not unfold exactly as planned. Knee pads are a good accessory in rocky terrain in case you have to move around while keeping a low profile.

Reeds

That's the basic formula. Lather, rinse, and repeat.

Thanks to JayMorr, who took the portraits of me used in this post. His blog has additional images and comments about getting TO the shot, which is the main ingredient in getting the shot when it comes to critters.

In Plain Sight

Wednesday, December 29, 2010

Better Wildlife Photography

People often accuse me of using excessively large words to express myself. I am mildly offended by these outrageous accusations, because my stated policy is to eschew obfuscation.

By way of rebuttal, I offer up my word of the day: ANTHROPOMORPHISM.

As everyone has known since 1753 (the first recorded use of this term according to Merriam Webster), anthropomorphism is the attribution human characteristics to inanimate objects.

What does this word have to do with better wildlife imagery? Simple - no other art form has such a high level of anthropomorphizing as photography. Our society loves a quick fix, and many feel that an eye-popping result is the natural, native output of expensive technology.

Upon seeing a compelling image, the first question usually posed to the photographer is, "What camera/lens do you use?" This can be a legitimate question for a number of technical reasons, but is more often symptomatic of the belief that "professional" gear was the main reason for the engaging outcome. This phenomenon has camera companies dancing the Light Fantastic, but for everyone else it's a simple delusion.

Great Horned Owl - Female

The first step towards better wildlife photography is to stop attributing the hard work, creativity, patience, practice, and skills that are critical for success to inanimate tools. These are all human traits - merits of photographers, not cameras. Step 1 is to quit anthropomorphizing, and start creating using whatever is in your bag.

The most important elements of a compelling wildlife image are light, composition, opportunity, and exposure (in no particular order). Cameras and lenses have no part in the first 3, and only a supporting role in the 4th.

LIGHT: Learning to "see" light, and recognize the characteristics that translate into various artistic outcomes is a skill that takes years to develop. Volumes have been written on this topic, and doing a Google search for "golden hour" will probably provide all you ever want to know about ideal illumination. To achieve the result you want as a photographer, your boots need to be on the ground (with you in them) when the light is right.

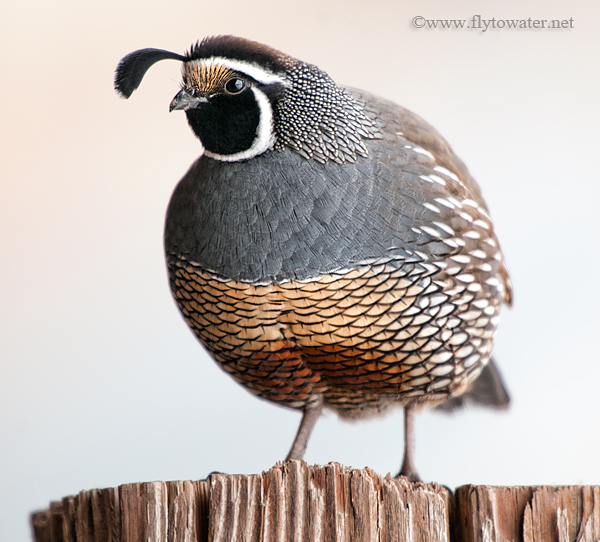
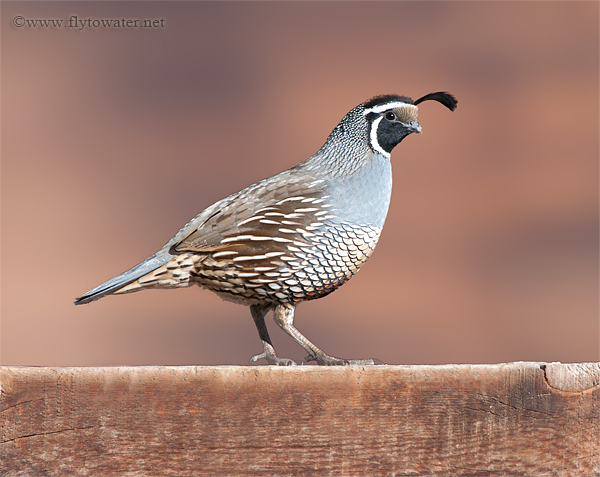
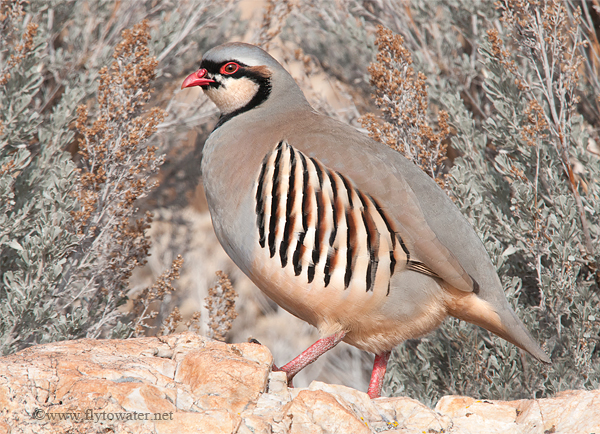
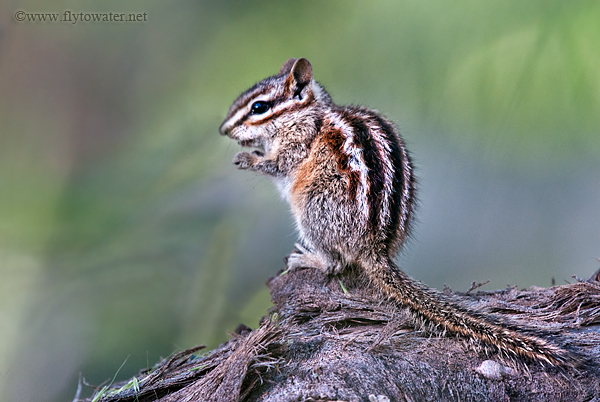
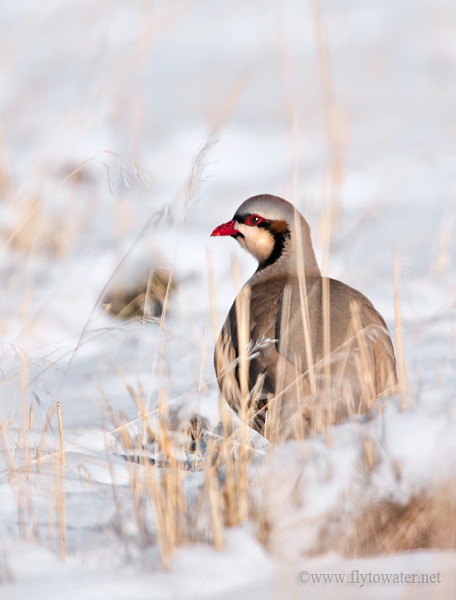
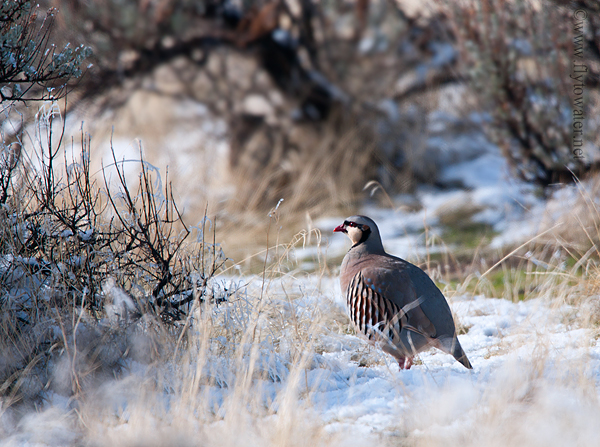
COMPOSITION: The way in which objects are arranged (intentionally and creatively) within the frame. There is nothing about composition that should be left to chance. Inclusion, exclusion, angle of view, position relative to the subject(s), portrait vs. landscape orientation, foreground, background, and many other considerations play an enormous part in how the viewer will interpret a 2-dimensional image. A great starting point on this topic is a book called "Photographic Composition" by Grill and Scanlon ($15 on Amazon). In this shot of a wild chukar partridge, I included both cheat grass in the foreground and sage brush in the background as compositional elements, but used shallow depth of field to isolate the subject. The bird is also positioned according to the Rule of Thirds.

Chukar Partridge Lookout

OPPORTUNITY: Think of 3 separate lines converging at different angles. One of these lines represents the right lighting conditions. The second is your wildlife subject, which will be somewhat unpredictable and dynamic. Line #3 represents surroundings that create a pleasing foreground, background, and overall composition. When each of these elements converge and intersect, the result is a window of opportunity . All 3 elements must be present to win. While some opportunities happen by chance, most are created through careful planning, understanding of subject behavior, a high degree of familiarity with your camera controls, awareness of your limitations, and a constant readiness to act.

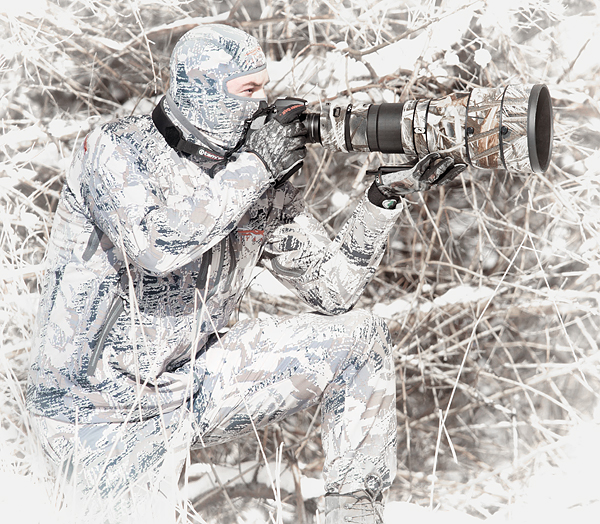
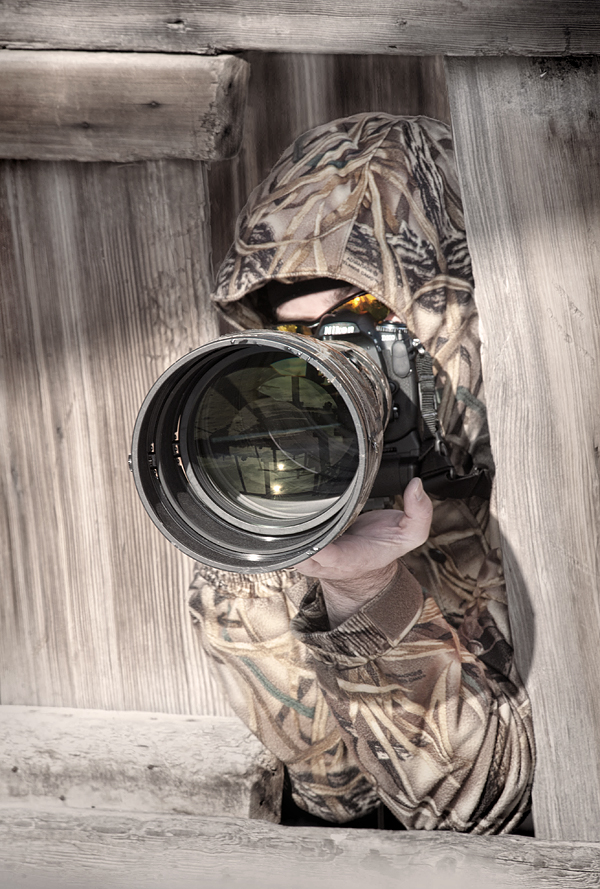
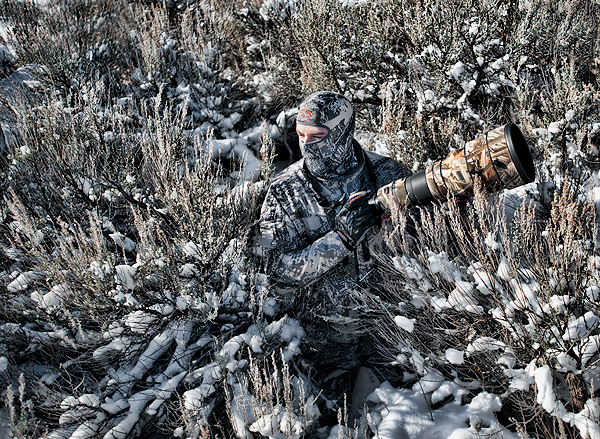
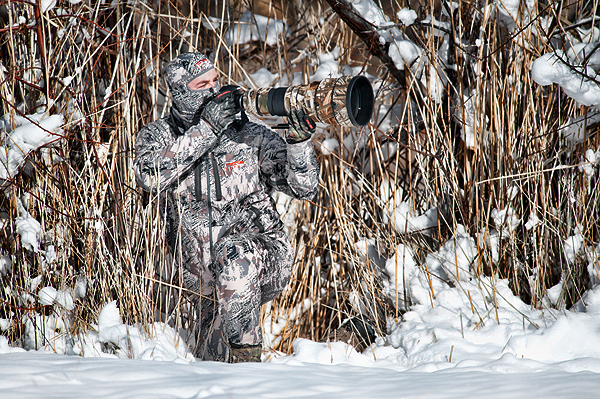
The single most challenging part of wildlife photography is getting close enough to the wildlife. Many point & shoot cameras offer 8x, 10x, or even 20x optical zooms in tiny little packages. The uninitiated often see huge telephoto lenses and assume they are camera-mounted galactic telescopes with the ability to capture amazing images of sparrows at 300 meters.

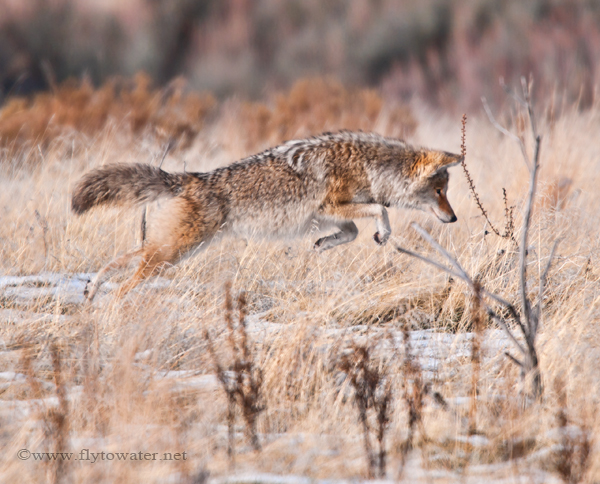
The truth is that big lenses are designed to let in more light, allowing for faster shutter speeds while maintaining high optical quality. The Nikon 400mm f/2.8 VR lens costs $9000 and weighs 13 pounds, but only provides the equivalent of 8x optical magnification. As a photographer, you need to be every bit as close to your subject with a super telephoto prime lens as you would with a cheap 8x point and shoot. Most quality wildlife imagery is captured inside of 60 yards, and often much closer (especially with smaller subjects). The coyote pictured below was 35 yards away, and was only in this position looking back at me for about 1 second.

Coyote Lookback

Working hard to pattern wildlife subjects and understand their behaviors will allow you to anticipate their location during ideal lighting conditions. In turn, this will improve your ability to be in the right place at the right time. Wildlife photographers spend most of their day scouting, observing, getting into position, and waiting. There is no magic bullet lens, teleconverter, or 25 megapixel sensor that will buy sweet monkey love over long distances. If the subject is too far away for a solid image to be captured, it's not a shortcoming of the equipment - but of the photographer's ability to close the distance.

EXPOSURE: Today's cameras all offer the pixie dust of Auto Mode - the enemy of creativity. Auto Mode is designed for one thing: Boring-Ass Snap Shots, or B.A.S.S. While the camera's electronics can interpret a scene and correctly expose the photograph for you, they cannot detect your vision of the final image.

Decisions to freeze action, blur motion, isolate a subject with shallow depth of field, or include both foreground and background elements in the composition are all consequences of different exposure choices. These strictly artistic decisions are directly related to how the viewer will connect to your image, and can't be left to a generic, pre-programmed function.

The good news here is that there are only about 5 key camera controls that do most of the legwork. Check out "Understanding Exposure" by Bryan Peterson ($15 on Amazon) if terms like aperture, f-stop, shutter speed, white balance, exposure compensation, and ISO are unfamiliar.

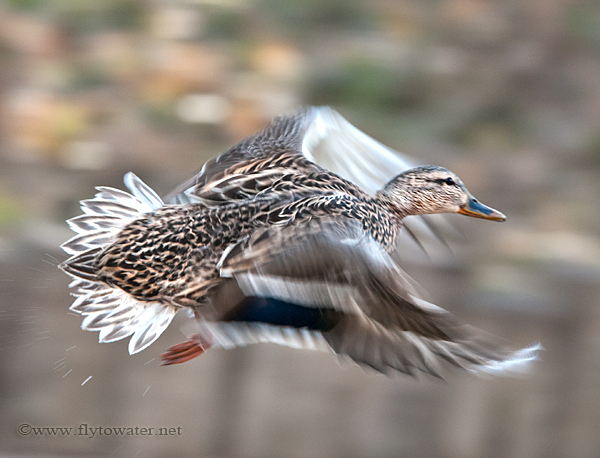
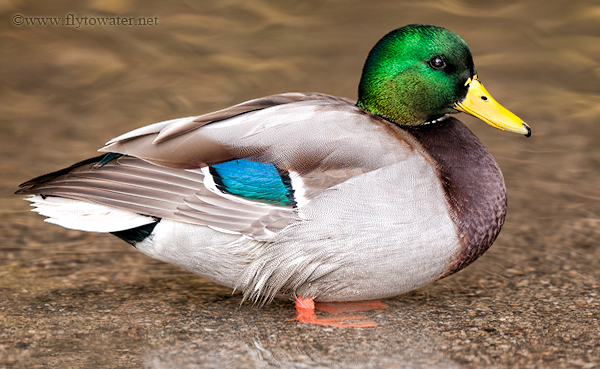
In these final 2 shots I used exposure for different effects. The mallard drake was stationary, and I wanted the colors and plumage of the bird to be the primary focus. Using a longer shutter speed I achieved motion blur in the faster moving background water, while maintaining sharpness on the bird itself. In the case of the coyote, I chose to freeze motion with a shutter speed of 1/3200 to capture his predatory intensity.

River Drake

Coyote Pounce

The moral to the story - use what you've got and don't put off chasing the imagery you desire until you have a better camera body or longer lens. Procrastination should not lilt off the tongue any easier than anthropomorphism - which is only 1 letter longer.

I'm wishing everyone a happy and prosperous New Year in 2011. Thanks for dropping in.